
You Don't Need
a Reshoot
The video was shot and the edit was finished, and the director wanted to add more to it. Three days later, 18 new moments were in the cut. Nobody went back to set, and the editor did not move a single cut.
Taomak Films
The released video, graded
The whole video on one line. Each black bar is a part that was added. Click a black bar to jump straight to how that part was made.
The problemA new idea after the shoot is over
Every production knows this moment. The shoot is over, the edit is approved, and somebody says: what if the title was on that wall? What if the driver changed on every beat? What if the camera flew from the car to the rooftop with no cut?
There used to be two answers. Bring the cast, the crew and the location back for another day, or let the idea go. Most of the time the idea goes, because the money is spent and the release date is fixed.
AI looks like a third answer, and plenty of people have tried it. They tend to hit the same wall. The artist's face comes back slightly wrong. The new shot is glossier than the camera footage on either side of it. It runs a few frames long, so the editor has to open a cut that was already signed off. The shot looks fine on its own and wrong in the video.
The result18 new moments, three days, nobody back on set
On RPT was filmed over one night in London, and the edit was finished when it reached me. It was produced by Nilante Ebun-Cole at Taomak Films and directed by Jack Stangaard. The ask was short: keep the edit, and make it more exciting.
Three days later the video had these in it:
- The opening titles, on a wall that was blank on the night
- A different driver at the wheel on every beat
- Lipstick writing on car windows that were filmed clean
- Camera moves that join shots filmed in separate places
The editor did not change a cut. The new shots were made to match the camera footage, so the colourist graded all of it together as one video. Drag the lines below to see what was filmed and what was delivered.
Why it went smoothlyEverything was added. Nothing was taken away.
The work went smoothly because of where it ended up. Each final shot sits on top of the picture that was already there, exactly where it was meant to go. The AI added to the footage. It did not change what was filmed, and it did not remove any of it.
Send me the cut and tell me what you wish you had shot. Within a day I will tell you what can be added, what should be left alone, and how long it would take.
Send the brief →how it was done
That was the result. What follows is the full technical breakdown: the method behind each shot, the tools, and the options that were offered and set aside. If you only needed to know whether this works on a finished video, you have already read that part.
The AI shots, back to back, before the grade. Every clip below this point is from the ungraded working cut, so the only difference between "original" and "with AI" is the AI.
// THE RULE OF THE JOB
Nothing gets re-cut for the AI.
The AI fits the cut.
On this video, every generated shot had to start and end on frames the editor had already chosen.
Most AI video you see online starts from a blank page. Someone has an idea, writes a prompt, and keeps whatever comes out best. This project started from the opposite end. The video had already been shot, and it had already been cut.
That is also why AI was the right tool for it. Every idea in this article arrived after the shoot: titles on a wall that was blank on the night, a different driver on each beat, writing on glass that was filmed clean, and camera moves between shots that were filmed separately. The usual answers to ideas like these are a pickup day or letting them go. AI gave a third answer, on one condition: the new shots had to sit beside real footage without being noticed.
AI was used in the Dizzee Rascal On RPT music video for transitions and invisible VFX, added after the video had been shot and edited, with no reshoot day and no change to the edit. There are 18 generated sections, about 41 seconds of the cut, and each one starts and ends on real frames from the edit. The video work was done in Seedance 2.5, Kling 4.0 and Wan 3.0, with stills from Nano Banana Pro and depth maps to carry camera moves from one model to another. The video was directed by Jack Stangaard and produced by Nilante Ebun-Cole of Taomak Films. The AI transitions and VFX are by Kevin Kuteli, who works as Wobbleman.
It was filmed over one night in London. There is a black convertible, a rooftop lounge with a sofa and string lights, a street under office towers, and a lot of performance to camera. By the time the edit reached me, the structure of the video was there and the song was laid under it.
My job was not to make a film. My job was to add a layer on top of one. The ask was short: keep the edit, and make the cuts between shots more exciting.
That sounds like a small job, and in screen time it is. The generated footage in the final video adds up to about 41 seconds out of two minutes and ten. But those 41 seconds are spread across 18 separate places in the cut, and every one of them is surrounded by camera footage on both sides. If a generated shot is a little soft, a little too clean, or a few frames out, you see it straight away, because the shot before it and the shot after it are real.
01 · The BriefWorking Inside Someone Else's Cut
The first thing I did was break the edit down. I pulled one frame from every shot, marked every cut, and worked out where the edit was fast and where it gave a shot room. You cannot plan a transition between two shots until you know exactly which frame one ends on and which frame the next begins on.
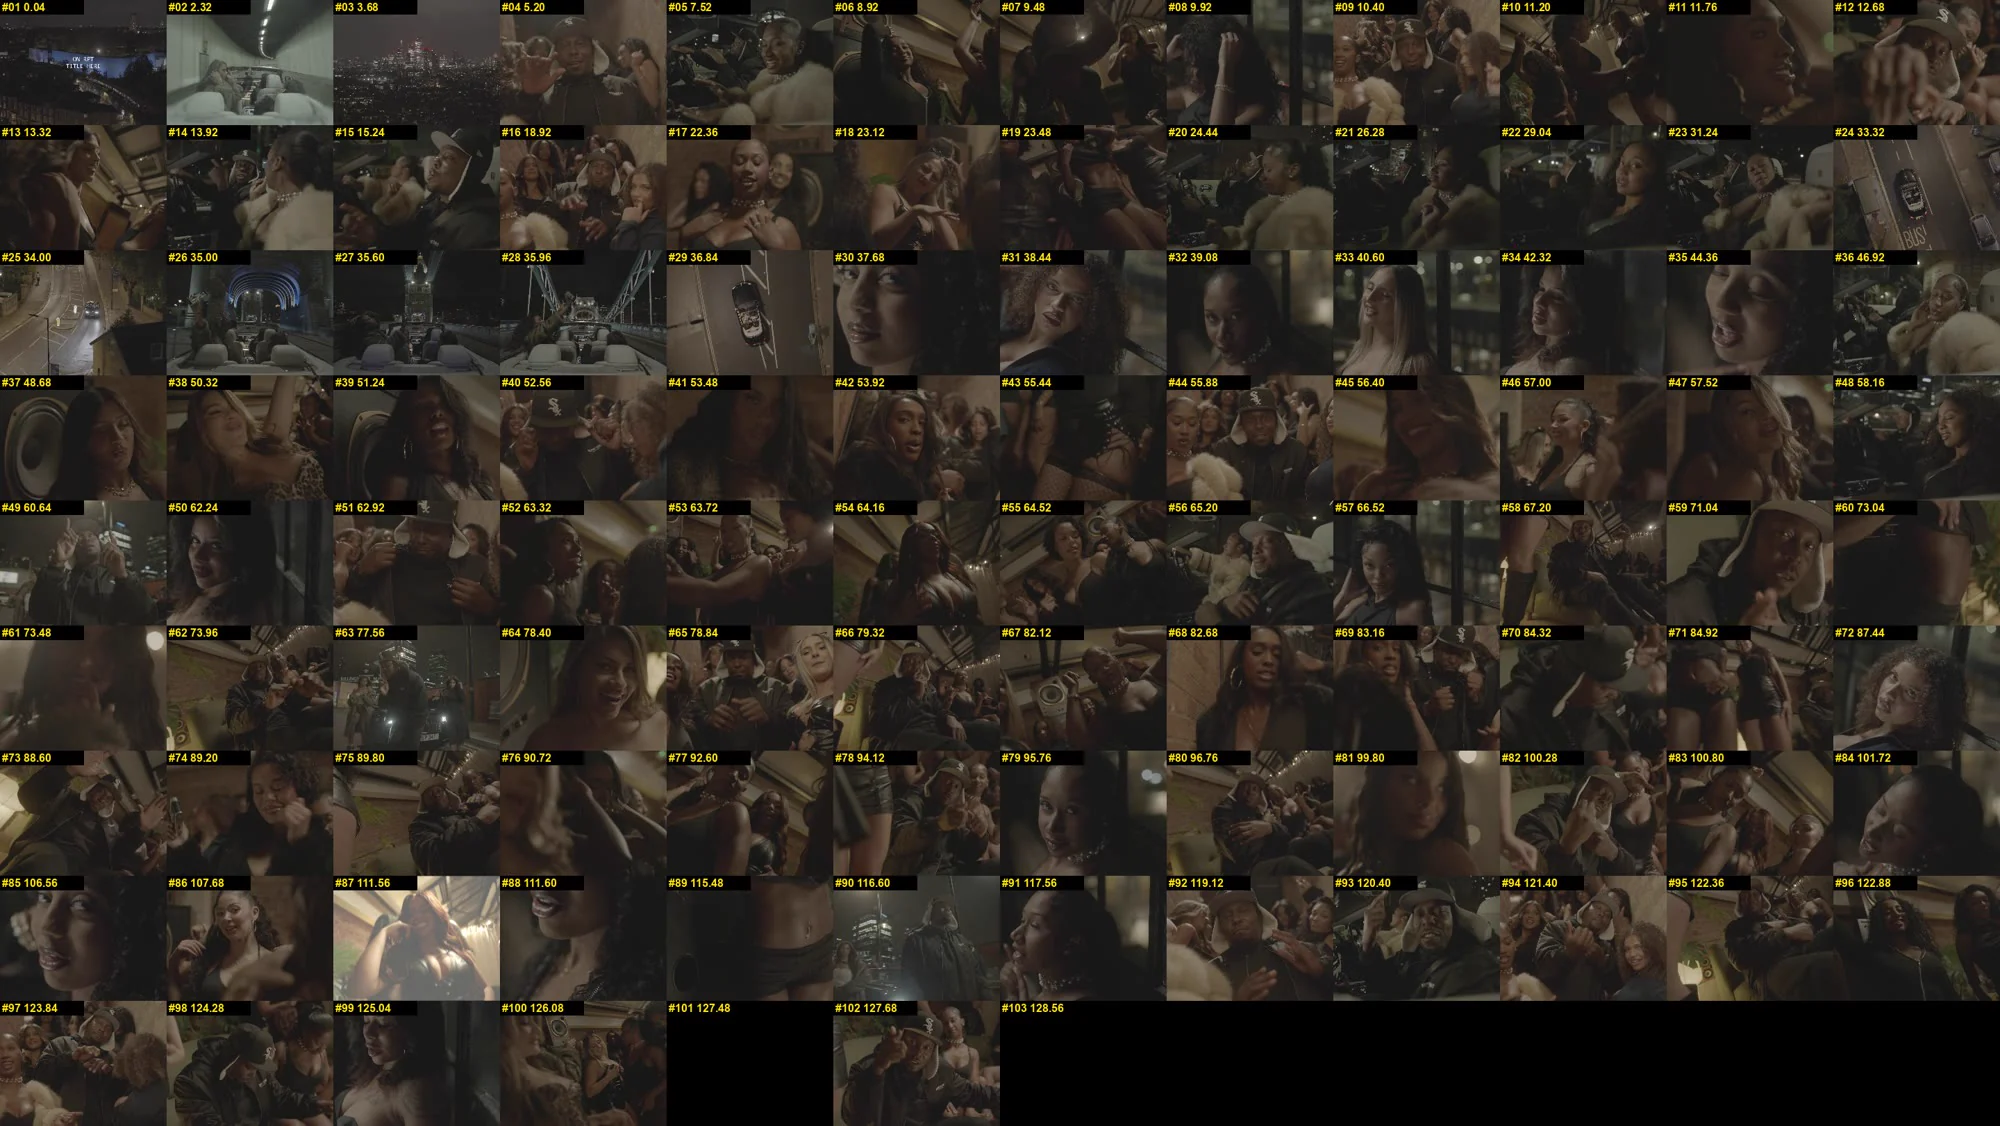
The footage was 4:3, 2880 x 2160, and ungraded. It had the flat, low contrast look that footage has before a colourist touches it. That detail shaped the whole job. Anything I generated had to match that flat look and not a finished one, so the colourist could grade camera footage and generated footage together afterwards. A model left to itself will hand you a punchy, contrasty image, and that image would have jumped out of this timeline.
At the very start we also tested full restyles. I ran six looks as stills on frames from the video: UV neon paint, light trails, zoom blur, a glitter rim light, a thermal camera look and a halftone print look. They were fun, and they were the wrong direction. The decision was made quickly that there would be no restyled video. The work would be transitions and a small number of invisible changes, and nothing else.

I set one rule for myself early: no transition longer than four seconds. A music video cut this fast cannot hold a long generated shot. Anything longer starts to feel like a different video has been spliced in.
The first video tests were made the same day. Each one takes the last frame of one shot and the first frame of the next, and lets a model invent the move between them: a push through a speaker cone, a pass through a fur coat, a hair whip from one singer to another. None of these four is in the video, but they set the method that everything else used.
Day one: first frame and last frame in, four seconds of travel out
02 · Opening Titles · 00:00:00Three Titles on One Real Wall
The video opens on an aerial shot of a train passing a blank blue wall. The idea was to put the titles on that wall like a switching billboard: the artist, then the track, then the director credit. The wall was blank on the night.
I made the three slides as stills first. Each one is an edit of a frame from the real shot, with the lettering placed on the wall in the right perspective. Then a video model played those three stills into the moving footage as a video edit, so the train, the camera and the light stay as they were filmed and only the wall changes.
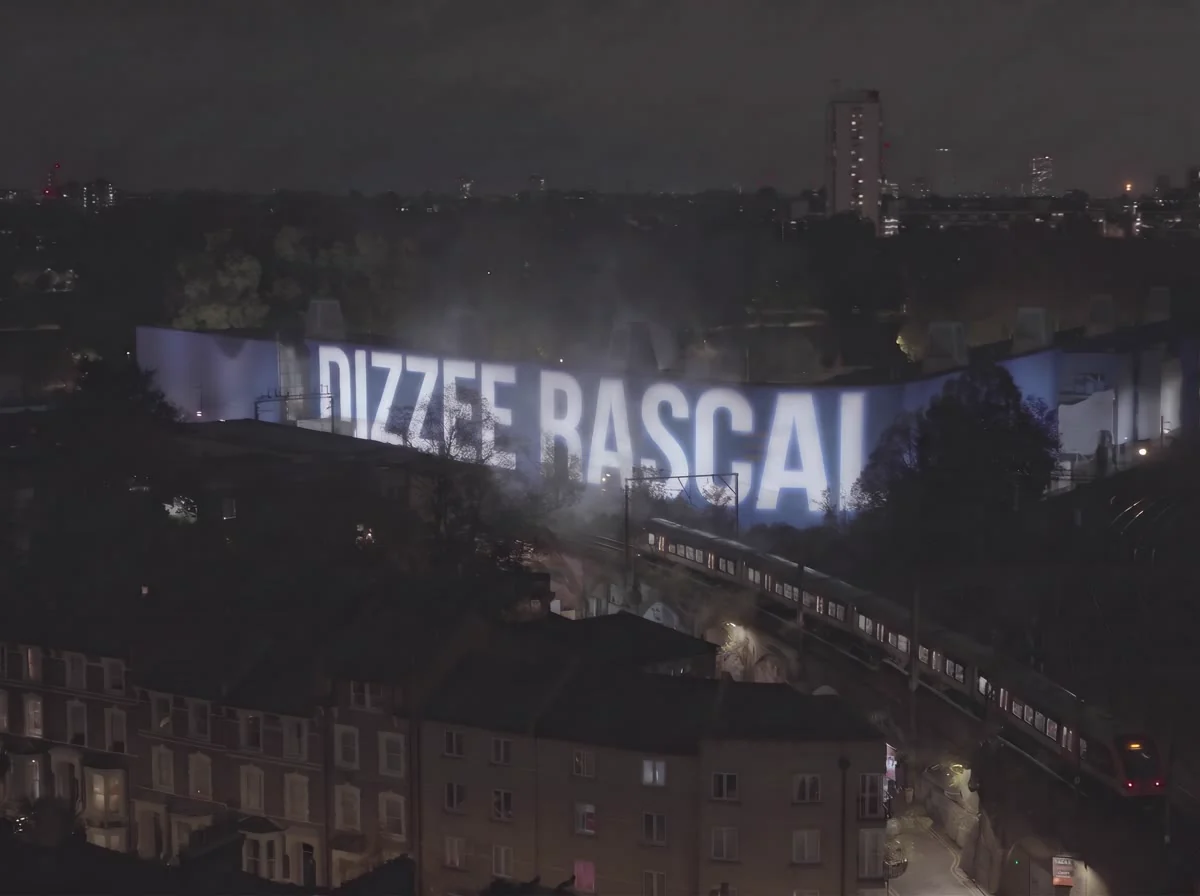
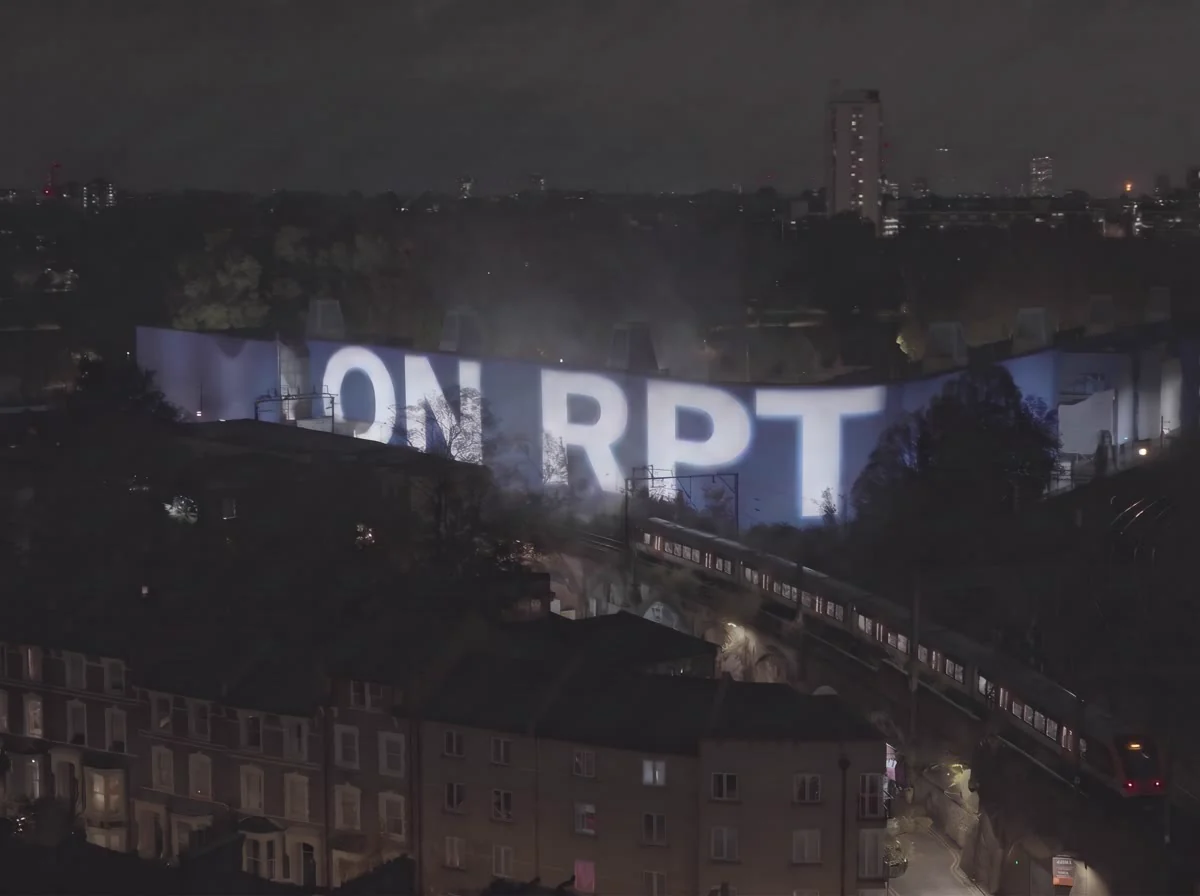
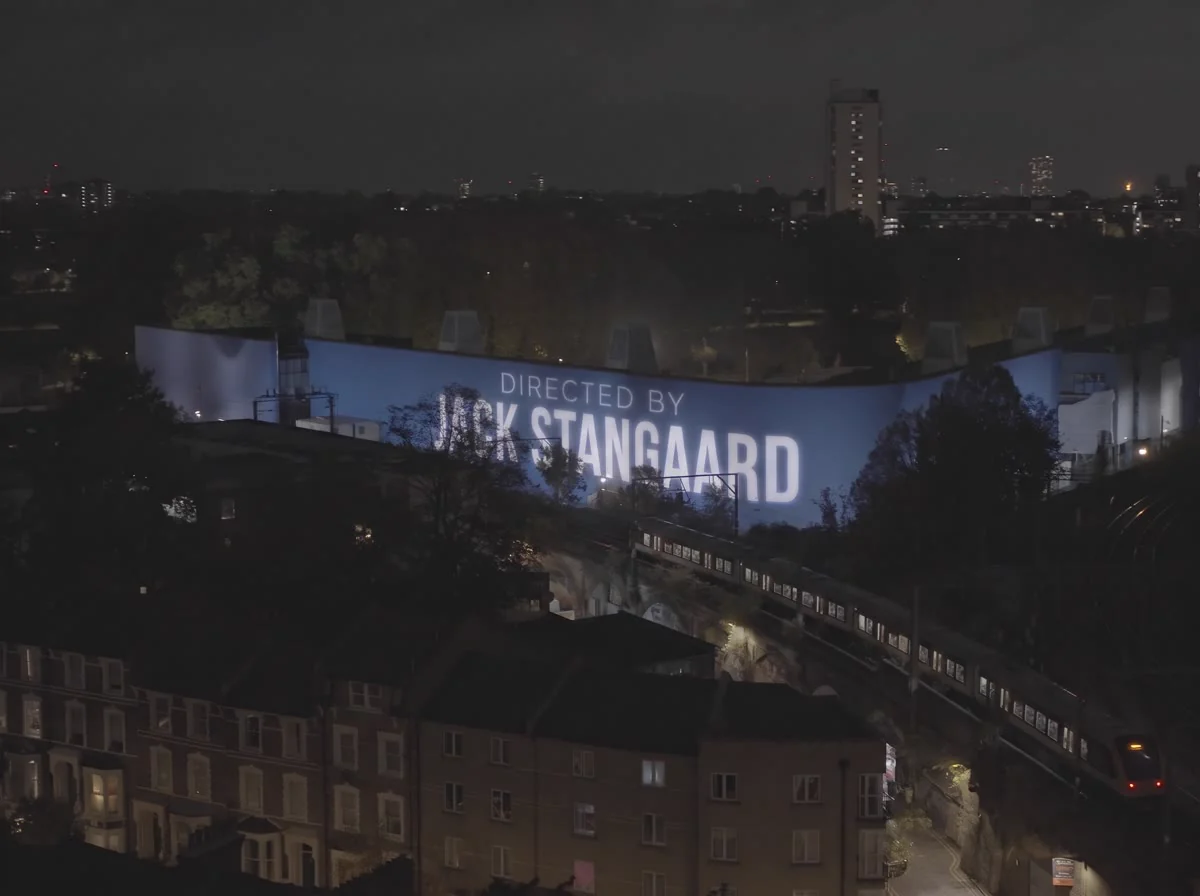
Lettering is the thing video models are least dependable at, so this shot was set up to leave the model very little room. The slides were finished stills before any video was generated, which means the model never had to design type. The real footage went in as the base, so there was no shot for it to invent either. Its only job was to play three known images onto one known wall, in order, on set timings.
I then checked each take with its frames laid out in a row. A wrong letter on a wall for one second is easy to miss at full speed and impossible to miss on a contact sheet. The take in the video carries all three slides in one continuous generation.
Finish the lettering as a still first. Give the model the real shot as its base. Ask it for one job only. Then check the take frame by frame before anyone else sees it.
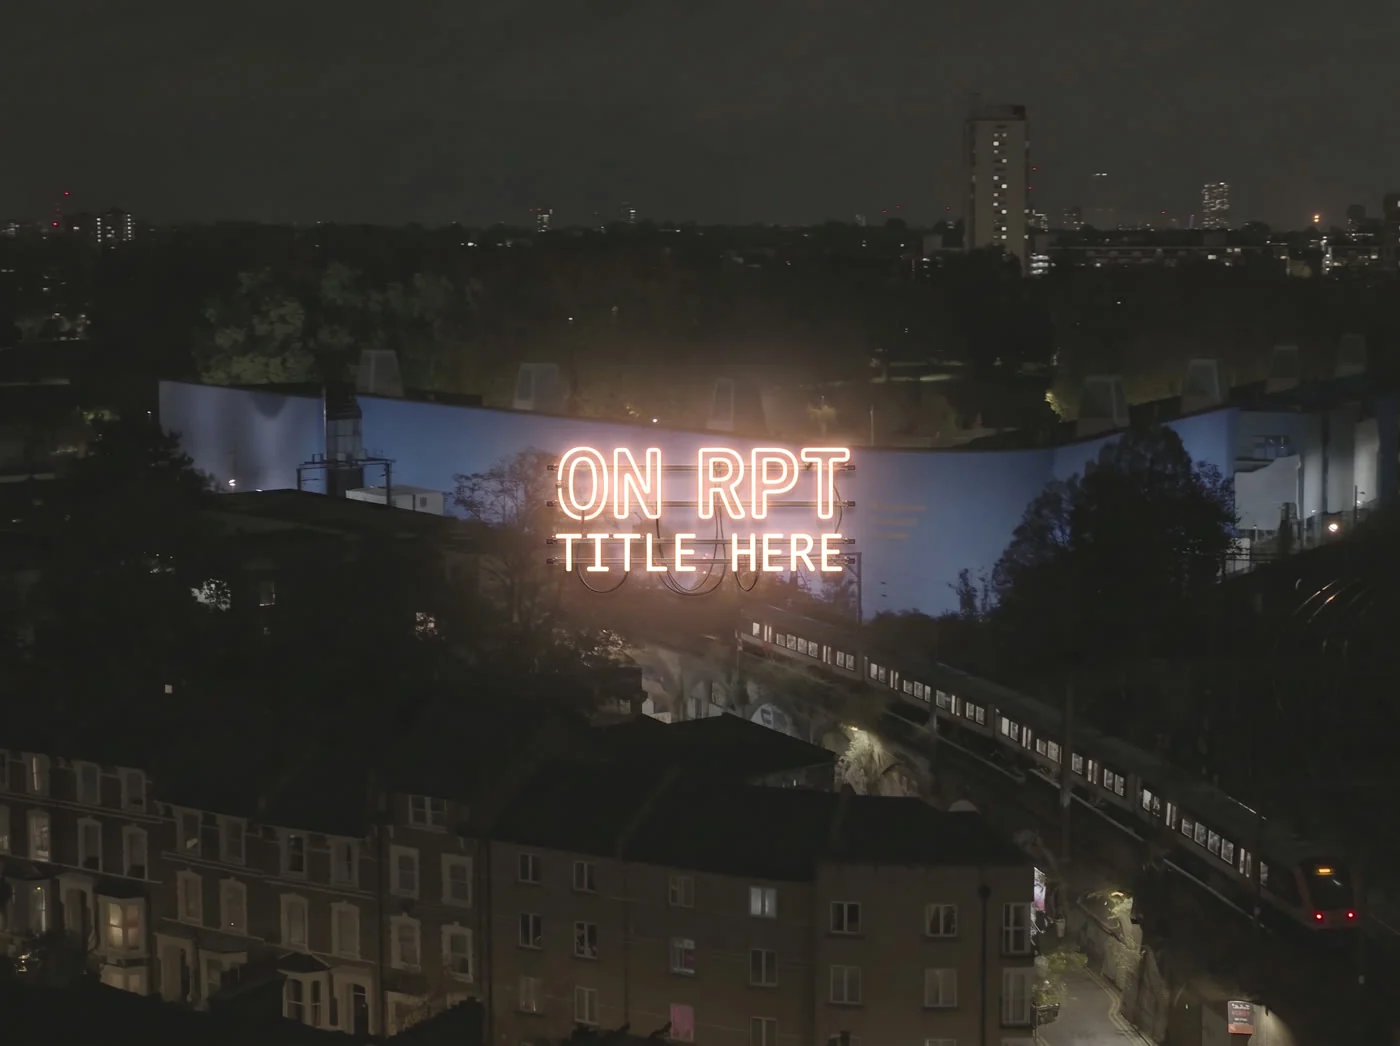
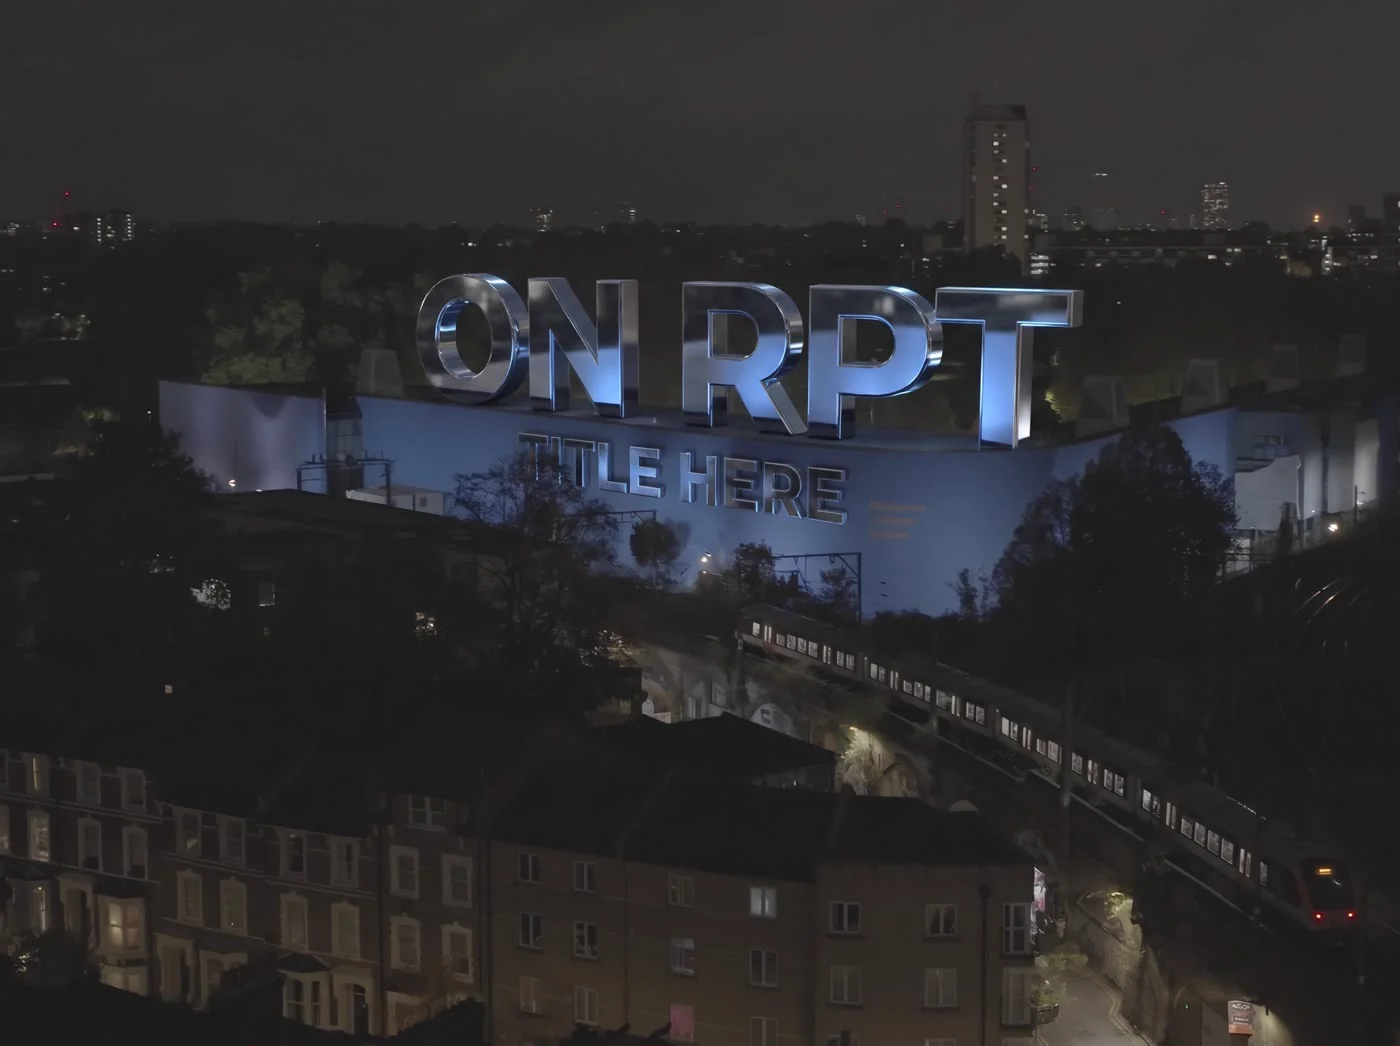
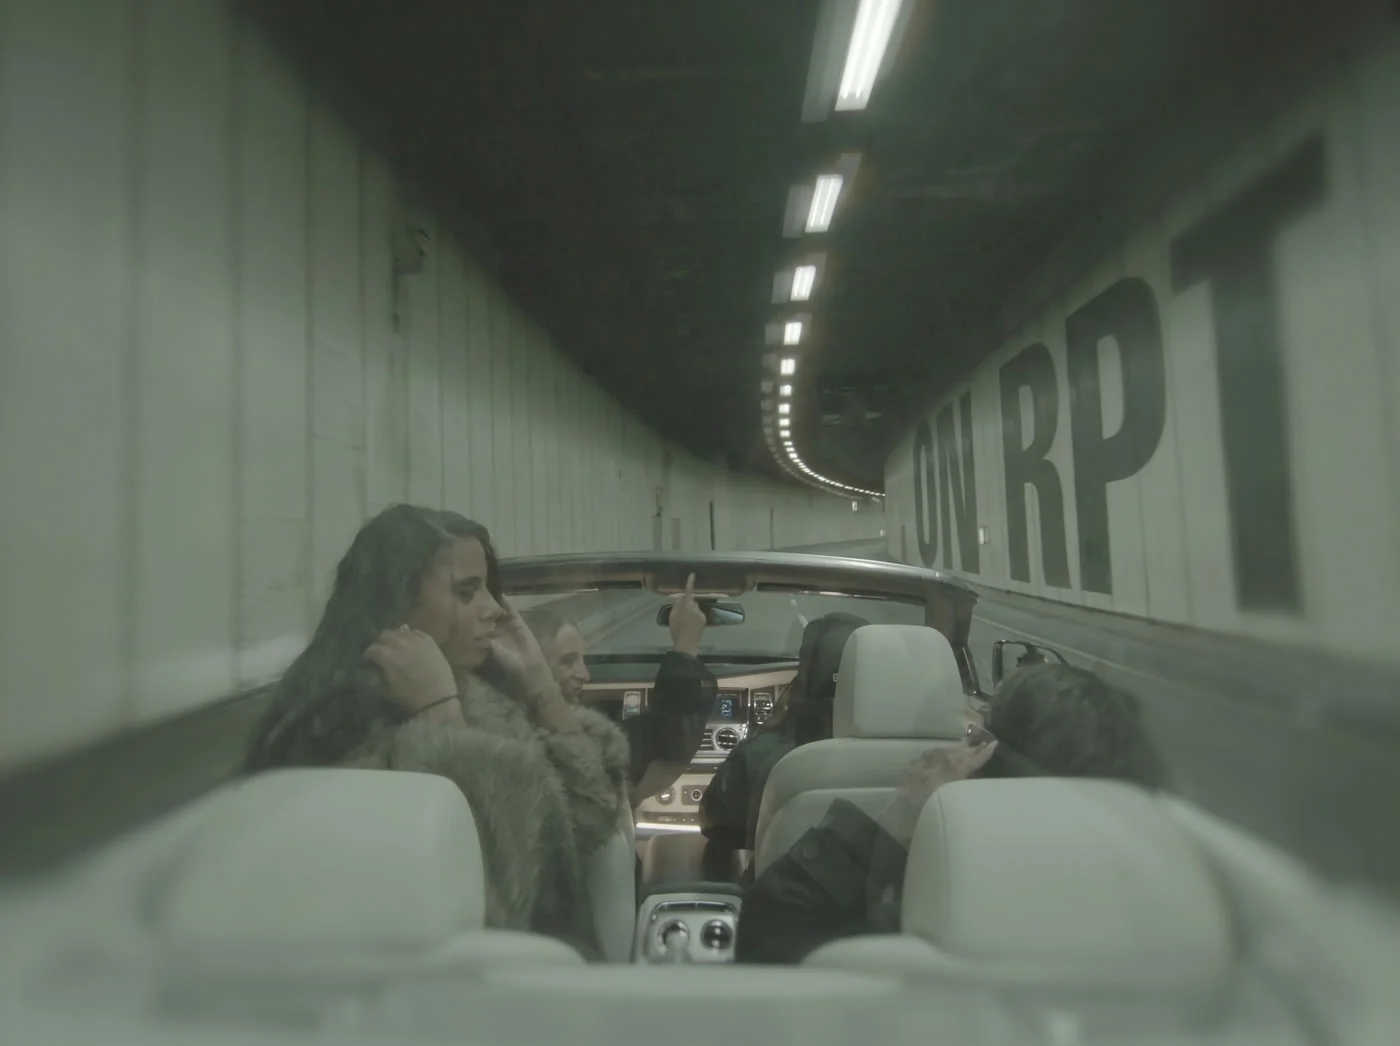
Other title ideas
The wall was not the only idea for the titles. Before it was chosen, I mocked up the title as a neon sign, as chrome letters, and painted on the wall of the tunnel the car drives through. I also built a longer opening as one continuous flight: from the title wall, down to the street, through the tunnel and out to the skyline. The director's cut opens faster than that, so the single wall shot won.
03 · Cast Swap on the Beat · 00:00:15A New Driver on Every Beat
In the real shot, the artist performs to camera from the passenger seat while one woman drives. The director's note was to switch the women on the beat. So in the final video the driver changes to a different woman from the shoot and back again, and each change lands on a kick. Filming that would have meant running the same take again with each woman at the wheel. Here the performance in the front seat is the one real take the whole way through.
I started this shot on one model and finished it on another. The first tests used Seedance. Wan 3.0 turned out to be the stronger model for this kind of edit, where most of the frame has to stay exactly as it was filmed and only one person changes, so the swap moved there. I pick the model per shot for that reason.
The method is a video edit of the real take. The model is given the real footage, a still of each woman it needs to switch to, and a prompt that states each switch as a time in seconds.

This shot depends on timing, so I measured where the kicks fall under it. Video models tend to land a timed change slightly late, so I measured that lag as well and wrote each switch time to allow for it. The changes land on the beat because the prompt was written from the waveform.
I keep it to one shot and a small number of switches, and write each one as a time in seconds with the model's lag already taken off. When a shot needs more changes than that, I generate each change separately and join them on the beat in the edit.
Other swaps we built
I built the same idea in other forms before the final one was chosen: a faster version with five switches inside the shot, and the swap moved to the sofa shot, where the woman beside the artist changes six times.
04 · AI VFX · Writing on the GlassAdding Something That Was Never Shot
Several women in the video sing at a window, and those shots were filmed against clean glass. The idea came afterwards: red kiss prints and the track title written in lipstick on the pane, in every window shot.
If this had been planned before the shoot, it would have taken a lipstick and five minutes. After the shoot it meant ten shots, each with a different woman, a different angle and a different piece of glass.
Each one is the real performance, regenerated with the lipstick physically on the window. It had to be soft and slightly out of focus, the way the glass is in the shot, and it had to stay on the pane and never drift onto her face. Most of the ten are Seedance edits of the real footage, with a still of the lipstick as the reference.
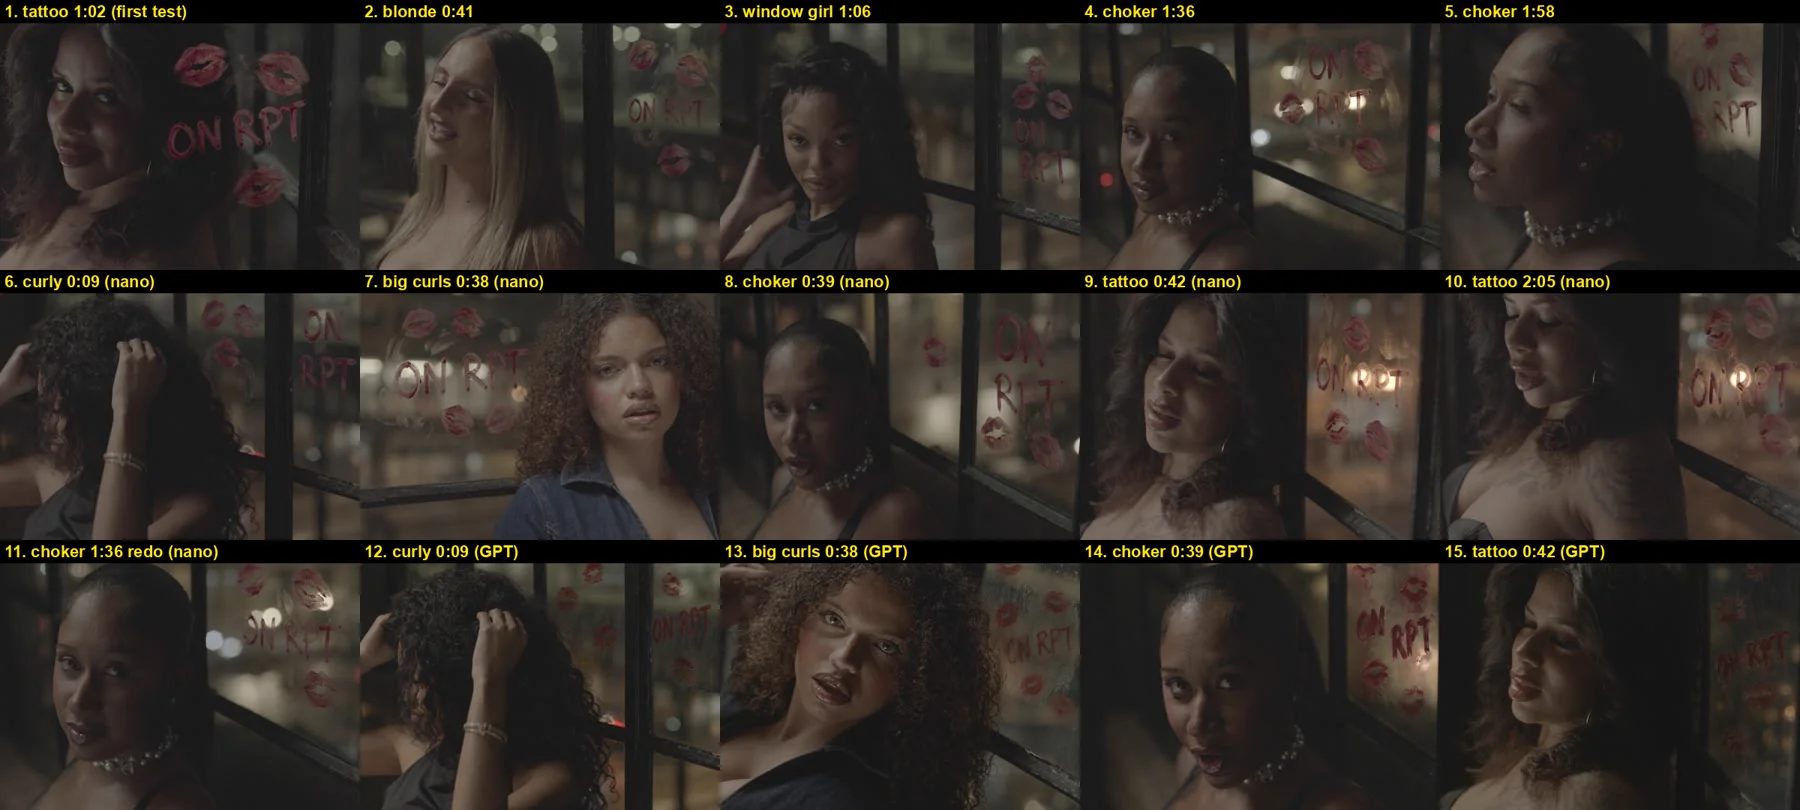
For the close-ups, where the window sits right beside her head, I painted the lipstick onto the opening frame as a still and gave the model that frame to start from, with the real footage underneath as the guide for her movement. When the lipstick is already there on frame one, the model keeps it there for the rest of the shot, in the same place and in the same handwriting.
One shot rebuilt from depth
Another close-up, at 01:44, looked low quality as a plain edit. I rebuilt that one from a depth map of the real footage, which is the method described further down. The depth map carries her movement and the camera. Real frames of her carry the face.
Real footage, its depth map, and the generated shot with the lipstick on the glass
05 · AI Transitions · Moves Nobody FilmedTurning Hard Cuts into One Camera
The rest of the work was movement. The edit had runs of fast cuts between performance shots, and the job was to turn some of those runs into a single camera travelling from one shot to the next. A real camera could not have made most of these moves, because the shots on either side were filmed separately.
The method is the same each time. I take real frames from the shots on either side and give them to a video model as keyframes. The model's job is the travel between them. Because every stop along the way is a frame that was filmed, the move starts real, ends real, and only the blur in the middle is invented.
Flash chain · 01:22
Four real frames from four different shots, joined into one move with a camera flash on each stop. In the edit these were hard cuts. Kling 4.0 took the four frames as keyframes and produced the whips between them. This was one of the director's favourites from the first round, and it stayed close to that first version.

Whips through the party · 00:50
Five shots of the lounge became one camera pushing and pulling through the crowd. The first version was faster. The note was to make it smoother, with less movement, so the one in the video is a calmer pass of the same move. A take that excites you in isolation is often too much once it sits in the edit.
Drone into the bridge · 00:33
The edit had a top-down drone shot of the car, and a separate shot from behind the car as it heads for Tower Bridge. I gave Seedance a frame of the first and the opening frame of the second, and it flew the camera down from the sky to the back of the car.
The take in the video is the first low resolution draft. The move was right, so I kept that take and finished it with a light upscale so it holds up in the timeline. I also made a depth map of it, so the same move can be regenerated at a higher quality if that is ever needed.
The full four-second draft and the depth map made from it
Lounge mix · 01:01
Nine real frames in a row, a first, seven in the middle and a last, given to Kling as one six-second move. It replaces a run of very short cuts with a single camera that passes through every one of those moments.
06 · JudgementKnowing What to Leave Out
Not everything I built is in the video. Part of the job is deciding what should not go in, and on this project the director's notes made that decision clear.
His notes on the first draft came back on the second day, each pinned to a timecode. He loved the flash chain and the window transitions. He asked for the women in the car to switch on the beat, for motion blur on the drone move so it reads faster, and for a longer hold on the artist before the camera swings away from him.
The notes that shaped the job were about realism. On one orbit he loved the move and did not believe the face. Two transitions he was not sure about at all, because they broke the realism of the moment they replaced.
Read together, the notes said one thing. Fast moves that start on a real frame and end on a real frame worked. Holding on a generated face, or swapping a real moment for a generated one, did not.
Dwelling on a generated face fails.
That became the working rule for everything after it. Keep the generated part of a shot in motion. Start and end on footage that was filmed. Spend as few frames as possible looking straight at a face the model drew. And where a face has to hold, find a way to make it the real one.
Two transitions came out of the cut after those notes, and real footage went back in their place. I think that is a normal and healthy part of this kind of work. A generated shot has to earn its place against the footage it replaces.
The transitions that stayed on the shelf
Alongside the moves in the video there were others that I built, showed and then left out. A director can only choose if there is something to choose from, so the cut points that mattered each got more than one idea, in more than one style.
Some of these were too much for the moment they sat in, or pulled attention away from the performance. A couple were good moves in the wrong place. All of them start and end on real frames from the edit, which is why any of them could have been dropped into the timeline if the answer had been yes.
Relighting the footage
Alongside the camera moves, I offered a relight on the real footage: one hard flash from the camera side, with the room dropped to black behind the performers. The performance and the timing stay as shot, and only the light changes. It was an option for the middle of the song, and the cut stayed with the original lighting.
07 · The Depth Map MethodKeep the Move, Replace the Picture
By the middle of the week I had a problem with two halves. Kling was giving me the best camera moves. Seedance was giving me the most believable people. I needed both in the same shot.
The orbit at 01:49 is where it came to a head. Kling had produced a move the director loved: the camera arcs around a woman dancing, brushes past her shoulder, whips through the lights and lands on the next shot. But the skin looked flat and her face had drifted. It read as AI, and he said so.
Running the same prompt on Seedance gave better skin and a looser move. I could have the camera or I could have the face.
The answer was a depth map. A depth map is a grey video where near things are white and far things are black. It holds the camera move and the position of every body in the frame, and nothing else. It has no faces, no colour and no texture in it.
So I ran the Kling clip through a depth model on my own machine and threw the picture away. What was left was the move. Then I gave Seedance that grey video, along with real frames of the people from the footage, and asked it to follow the first and paint from the second.
The stills carry the people.
The orbit at 01:49. It ends on the first frame of a real shot, so the cut back into camera footage is hidden

It worked on the first pass. The result followed the Kling move beat for beat and came out in full colour with real-looking skin, and there was no trace of the grey video in it. That is the orbit in the video.
After that the method became a tool I could reach for. The robot-arm move at 01:28 was built the same way, and so was a short whip transition a few seconds later.
The robot-arm move at 01:28. Whips between four stations, then real faces at every stop
A depth map carries position and movement, so on a frame of pure motion blur there is less for the model to follow. It does not carry timing either, so timed changes like the driver swap in the car are still handled in the prompt.
The same orbit, three other ways
Before depth, I tested the orbit as a straight dolly move, as the same prompt on Seedance, and from the first and last frame alone. Side by side they show the trade: each one has either the move or the skin. The depth version is the one that has both.
I also rebuilt the flash chain this way on Seedance, as an alternative to the Kling version in the video.
08 · Character ConsistencyKeeping Real People Real
Almost every generated shot in this video has someone from the shoot in it. These are real people who turned up, performed and will watch the finished video. A video model does not know that. Given the chance, it will turn each of them into a slightly different person, usually a more generic one.
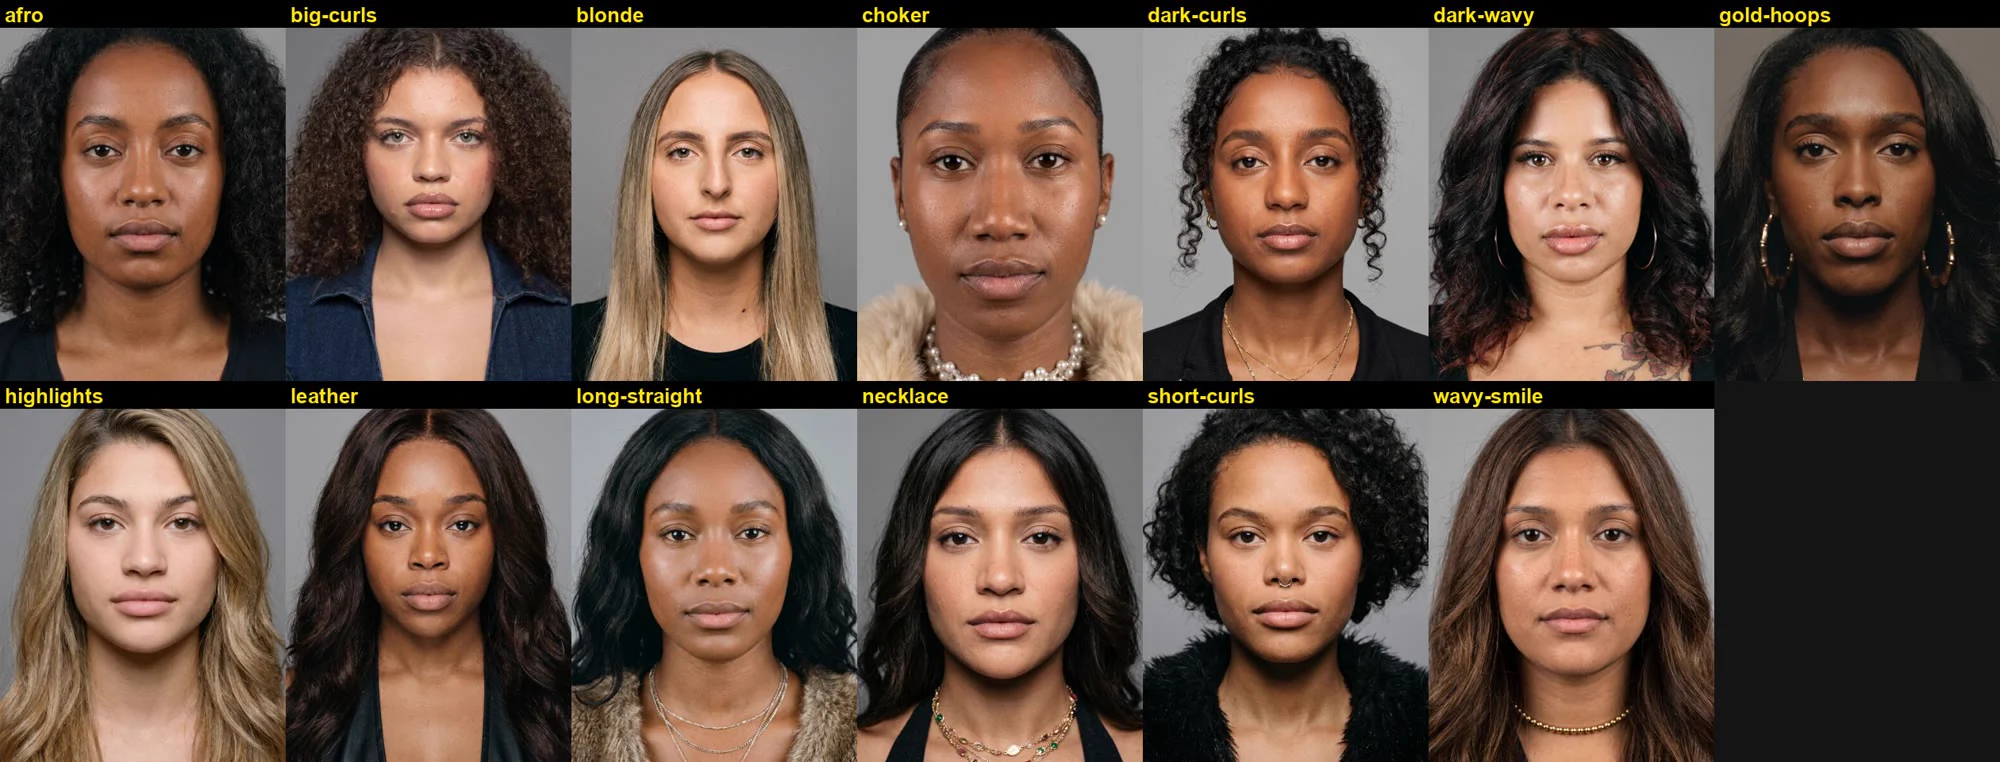
So I went through the footage and pulled the clearest frames of each woman, then built a reference sheet for each of them on flat grey with the face first. Those sheets and the real frames behind them went into the generations as the answer to the question of who this is.
The instructions for the sheets were strict. Copy her feature by feature. Do not beautify her. Do not drift toward a model's face or a famous one. And never make her skin lighter than the footage shows. That last one needed saying out loud, because the footage was flat and low contrast, and models read flat footage as lighter skin unless they are told otherwise.
09 · Finishing · Back Into the TimelineUpscaling, Matching and Delivering
A generated shot that looks right in a preview window is about half done. The other half is getting it into the edit at the right size, on the right frames, in a form the editor can drop in without thinking.
The models output at about 1664 x 1248, and a few shots only existed as smaller drafts. The edit is 2880 x 2160. Every generated source had to be upscaled, and I was careful about how. I wanted the same picture at a higher resolution, with no detail added that was not in the shot. An upscaler that invents pores and sharp edges makes a generated shot look more generated, not less. So most shots went through at a light setting, enough to hold up next to camera footage and no more.
The lipstick shots were the exception. They are close-ups of faces, and faces show sharpening before anything else does, so they went through a different and softer upscale.
Then came the part nobody sees. The edit had speed changes on many of these clips, so a generated source and its place in the timeline did not line up one to one. I rebuilt each piece to match the final cut frame for frame, at 25 frames per second, with any speed change already built in. Each file was named with its timeline timecode. The pieces were also laid out as a layer in a Premiere sequence, so they could sit on a track above the old clips and nothing had to be lined up by hand.
Before the package went out, I compared the new export against the previous one frame by frame to confirm that nothing had gone missing or shifted without anyone meaning it to.
From the day the edit arrived to the final package was three days.
| Stills | Nano Banana Pro for titles, lipstick references and face sheets |
| Video | Seedance 2.5, Kling 4.0, Wan 3.0 |
| Depth | A depth model run locally on an RTX 3090 |
| Masks | SAM 3 |
| Upscale | Topaz, to 2880 x 2160 |
| Edit | Premiere Pro, 25 fps, 4:3 |
| Checks | Every take frame-checked against the edit before it was shown |
10 · The Final FrameThe Edit Decides
None of the hard parts of this job were about prompting. The models can make a striking four seconds of video on almost any brief. What they cannot do is care about the frame before and the frame after.
Fitting the cut was the work. That meant knowing which frame a shot had to start on, measuring where the beat falls, noticing that a face has drifted, checking a take frame by frame for one wrong letter, and being willing to pull a transition out when the real footage was better. Most of that is editing and post-production. I was doing the same kind of thinking I did for years before any of these tools existed, with a new kind of footage on the timeline.
There is a version of this project where AI makes the video louder and worse. Full restyles, long generated shots, faces held for too long. We tested some of that at the start and walked away from it.
What ended up in the video is quieter. A wall that carries the titles. A driver who changes on the beat. Lipstick on glass that was clean on the night. A camera that travels where the edit used to cut. If it works, most people watching will not know which 41 seconds were generated.
That was the brief.
- A finished video can gain new shots without a reshoot day
- The edit stays as the editor cut it, and the new shots fit it frame for frame
- Ideas that arrive after the shoot can still make it into the video
- Real people from the shoot stay themselves in generated shots
- What does not serve the video comes out, including my own shots
QuestionsAI in Music Videos, Answered
How was AI used in the Dizzee Rascal On RPT music video?
AI was used for transitions and invisible VFX, added after the video had been shot and edited. There are 18 generated sections in the cut, about 41 seconds in total. They cover the opening titles on a real wall, a driver who changes on the beat, lipstick on the window glass in ten shots, and camera moves that join real shots together. Every generated shot starts and ends on real frames from the edit.
Can AI be added to a music video after the edit is locked?
Yes. On this video nothing was re-cut for the AI. I took the last frame of one shot and the first frame of the next, generated the move between them, and matched each piece to the edit frame for frame at 25 frames per second. The editor received files named by timecode that sit on a track above the original clips.
Which AI video models work for music video transitions?
I used three on this job and chose between them per shot. Kling 4.0 gave the strongest camera moves from real keyframes. Seedance 2.5 gave the most believable people and handled edits of real footage. Wan 3.0 was the better choice for the driver swap in the car, where most of the frame has to stay as filmed and one person changes. The stills, such as the title slides, were made in Nano Banana Pro.
How do you make an AI transition between two real shots?
Give the model real frames as keyframes: the frame the first shot ends on and the frame the next shot begins on. The model generates only the travel between them, so the move starts real and ends real. I kept every transition to four seconds or less, because a music video cut this fast cannot hold a long generated shot.
How do you keep real people looking like themselves in AI video?
I pulled the clearest frames of each person from the footage and built a reference sheet for each one on flat grey, with the face first. Those sheets and the real frames go into every generation. The other half is shot design: spend as few frames as possible on a face the model drew, and end the shot on footage that was filmed.
What does a depth map do in AI video production?
A depth map is a grey video where near things are white and far things are black. It holds the camera move and the position of every body in the frame, with no faces, colour or texture. I use it to take a camera move from one model and have a second model repaint it from real frames of the people. The move stays and the picture is replaced.
How do you match AI footage to camera footage in the edit?
Generate to the look of the ungraded footage, so the colourist can grade camera footage and generated footage together. Upscale lightly to the resolution of the edit, here 2880 x 2160, without adding detail that was not in the shot. Then conform each piece to the cut frame for frame, with any speed change already built in.
How long does AI work on a music video take?
On this video it was three days from the day the edit arrived to the final package. That covered 18 generated sections, the director's notes and the finishing.
Related reading
The Production Behind the Prompt: a national commercial made with AI
Choosing the right AI model
The consistency problem in AI video
Why AI video still needs traditional VFX
Send the cut, the brief and the deadline. I will tell you what is realistic and how the work would run.
Send the brief →Kevin Kuteli
AI Creative Director and Creative Technologist. Came to AI through production, not prompting: an editor, motion graphics lead and VFX supervisor before the first model. Works with agencies, directors and brands as Wobbleman.
// Written from direct production experience on the On RPT music video.